Since Amazon decided all of their requests needed to be authenticated, developers have been scrambling to convert their existing code to work with their new authentication architecture.
Here’s an excerpt of the email you probably received:
“… signatures will be necessary to authenticate each call to the Product Advertising API. This requirement will be phased in starting May 11, 2009, and by August 15, 2009, all calls to the Product Advertising API must be authenticated or they will not be processed. For pointers on how you can easily authenticate requests to the Product Advertising API, please refer to the developer guide, available here.”
You can find the developer guide documentation they are referring to here:
Product Advertising API
The documentation is very thorough and complete, but doesn’t get to the gist of the problem: what do I need to do in order to make my existing request, still work?
After some research, I came across the work of a couple of individuals, made some slight modifications, and have come up with a function that should help you. Here are the works I am referring to:
Amazon Product Advertising API Signature – PHP
REST Authentication for PHP4
If you’re using PHP and the REST architecture, then you’ve probably got something in your script that creates your URI and fires it off with a file_get_contents and simplexml_load_string.
In this case, you’ve probably already got everything together to create your nice URI. It may look something like this:
$uri = "http://webservices.amazon.com/onca/xml?" .
       "Service=AWSECommerceService" .
       "&Operation=ItemSearch" .
       "&MerchantId=All" .
       "&Condition=All" .
       "&Availability=Available" .
       "&Sort={$sort_by}" .
       "&Version={$amazon_version}" .
       "&SubscriptionId={$amazon_subscription_id}" .
       "&AssociateTag={$amazon_associate_tag}" .
       "&{$amazon_search_type}={$search_title}" .
       "&SearchIndex={$search_database}" .
"&ResponseGroup={$information_requested}"; |
$uri = "http://webservices.amazon.com/onca/xml?" .
"Service=AWSECommerceService" .
"&Operation=ItemSearch" .
"&MerchantId=All" .
"&Condition=All" .
"&Availability=Available" .
"&Sort={$sort_by}" .
"&Version={$amazon_version}" .
"&SubscriptionId={$amazon_subscription_id}" .
"&AssociateTag={$amazon_associate_tag}" .
"&{$amazon_search_type}={$search_title}" .
"&SearchIndex={$search_database}" .
"&ResponseGroup={$information_requested}";
The new requirements allow you to still use your old code, but there are modifications necessary. A date needs to be added, a signature needs to be created and the keys/URI have to be ordered/formatted correctly with all the necessary character replacements in order for everything to work. It seems like it could be quite a task to write something that works very differently from your previous code.
In the end, I was able to take my original URI and feed it into a function, and let the code continue along it’s merry way. Here’s what I came up with:
/**
  * This function will take an existing Amazon request and change it so that it will be usable
  * with the new authentication.
  *
  * @param string $secret_key - your Amazon AWS secret key
  * @param string $request - your existing request URI
  * @param string $access_key - your Amazon AWS access key
  * @param string $version - (optional) the version of the service you are using
  */
function getRequest($secret_key, $request, $access_key = false, $version = '2009-03-01') {
    // Get a nice array of elements to work with
    $uri_elements = parse_url($request);

    // Grab our request elements
    $request = $uri_elements['query'];

    // Throw them into an array
    parse_str($request, $parameters);

    // Add the new required paramters
    $parameters['Timestamp'] = gmdate("Y-m-d\TH:i:s\Z");
    $parameters['Version'] = $version;
    if (strlen($access_key) > 0) {
        $parameters['AWSAccessKeyId'] = $access_key;
    }

    // The new authentication requirements need the keys to be sorted
    ksort($parameters);

    // Create our new request
    foreach ($parameters as $parameter => $value) {
        // We need to be sure we properly encode the value of our parameter
        $parameter = str_replace("%7E", "~", rawurlencode($parameter));
        $value = str_replace("%7E", "~", rawurlencode($value));
        $request_array[] = $parameter . '=' . $value;
    }

    // Put our & symbol at the beginning of each of our request variables and put it in a string
    $new_request = implode('&', $request_array);

    // Create our signature string
    $signature_string = "GET\n{$uri_elements['host']}\n{$uri_elements['path']}\n{$new_request}";

    // Create our signature using hash_hmac
    $signature = urlencode(base64_encode(hash_hmac('sha256', $signature_string, $secret_key, true)));

    // Return our new request
    return "http://{$uri_elements['host']}{$uri_elements['path']}?{$new_request}&Signature={$signature}";
} |
/**
* This function will take an existing Amazon request and change it so that it will be usable
* with the new authentication.
*
* @param string $secret_key - your Amazon AWS secret key
* @param string $request - your existing request URI
* @param string $access_key - your Amazon AWS access key
* @param string $version - (optional) the version of the service you are using
*/
function getRequest($secret_key, $request, $access_key = false, $version = '2009-03-01') {
// Get a nice array of elements to work with
$uri_elements = parse_url($request);
// Grab our request elements
$request = $uri_elements['query'];
// Throw them into an array
parse_str($request, $parameters);
// Add the new required paramters
$parameters['Timestamp'] = gmdate("Y-m-d\TH:i:s\Z");
$parameters['Version'] = $version;
if (strlen($access_key) > 0) {
$parameters['AWSAccessKeyId'] = $access_key;
}
// The new authentication requirements need the keys to be sorted
ksort($parameters);
// Create our new request
foreach ($parameters as $parameter => $value) {
// We need to be sure we properly encode the value of our parameter
$parameter = str_replace("%7E", "~", rawurlencode($parameter));
$value = str_replace("%7E", "~", rawurlencode($value));
$request_array[] = $parameter . '=' . $value;
}
// Put our & symbol at the beginning of each of our request variables and put it in a string
$new_request = implode('&', $request_array);
// Create our signature string
$signature_string = "GET\n{$uri_elements['host']}\n{$uri_elements['path']}\n{$new_request}";
// Create our signature using hash_hmac
$signature = urlencode(base64_encode(hash_hmac('sha256', $signature_string, $secret_key, true)));
// Return our new request
return "http://{$uri_elements['host']}{$uri_elements['path']}?{$new_request}&Signature={$signature}";
}
I hope others find this helpful. If you have any comments or changes to the code, feel free to submit them below.
If you liked this post, then please consider subscribing to my feed.

Personal coding styles can be a big thing for some people. It can take a while for some people to figure out what styles are their favorite. For instance: I used to code by putting curly braces on their own lines; I have since changed. Unfortunately, I’m constantly coming across my own code (and the code of others) where this coding style is still practiced. For a while I’ve been using a couple of Vim commands to help search and replace for these curly braces quickly and easily. I figured others might be able to use these commands too.
Let’s start with the original code where the curly braces are on their own lines:
if ($this)
{
    dostuff();
}
else if ($other)
{
    dosomethingelse();
}
else
{
    dothattoo();
} |
if ($this)
{
dostuff();
}
else if ($other)
{
dosomethingelse();
}
else
{
dothattoo();
}
Now, we can use one, or a combination of, these commands to reformat the code so the curly braces are not on their own lines. First we have:
This command will replace the instances where we have if statements followed by a curly brace on the next line. So, it will turn this:
…into this:
The next command is:
%s/}\s*\n\s*else\s*\n\s*{/} else {/pg |
%s/}\s*\n\s*else\s*\n\s*{/} else {/pg
This will replace the areas where an else statement is in the middle of two curly braces. It will turn this:
…into this:
Lastly, we have:
%s/}\s*\n\s*else if (/} else if (/pg |
%s/}\s*\n\s*else if (/} else if (/pg
This will help us with the areas where we have else if statements in between two curly braces. It will turn this:
…into this:
So, in the end you get your nicely formatted code:
if ($this) {
dostuff();
}
else if ($other)
{
dosomethingelse();
} else {
dothattoo();
} |
if ($this) {
    dostuff();
} else if ($other) {
    dosomethingelse();
} else {
    dothattoo();
}
There you go!
If you enjoyed this post, then please consider subscribing to my feed.
Our servers are getting ready to be awaken by the masses. As such, we needed to ensure our servers would not simply fall over if we should get a sudden influx of traffic when we open our doors to everyone.
When we first released our software, we quickly found that we needed to adjust some Apache and PostgreSQL settings in addition to installing a real PG connection pooler in the form of PgBouncer from the wonderful people at Skype. This is on top of our moderately heavy memcached usage that is already working at the application level. The specifics of this phase of development and the changes made to account for our load are for the next post. You can subscribe to my feed if you’d like to know when that is published.
For now, let’s get to the benchmarks.
Due to our previous changes, things were running smoothly. The various instances of the application were running well on their hardware. However, we hadn’t opened the doors for our service yet. We knew that we would need our servers to be able to handle much more load than they were currently handling. So, we set up some nearly identical to production servers and went to town with Apache Bench.
We’re currently running the following versions of applicable software for these tests:
For the test, I used ApacheBench, Version 2.0.40-dev. Data was collected by running and entering the information into OpenOffice’s Calc. The graphs were also made with this.
The versions of the two caches that were used are Squid Web Proxy Cache 2.6.STABLE5 and Alternative PHP Cache, which is to be included in PHP 6.
The tests were run on a server that sits in the same data center as the other server to minimize latency issues. Each test was performed 3 times to try to get more accurate measurements. Every test was accompanied by the proper headers to ensure mod_deflate was being used. The number of tests (specified by the -n option) was 500 for any concurrency less than 100. For any concurrency greater than 100, 1000 tests were performed. The peak load numbers were gathered from watching top during each test.
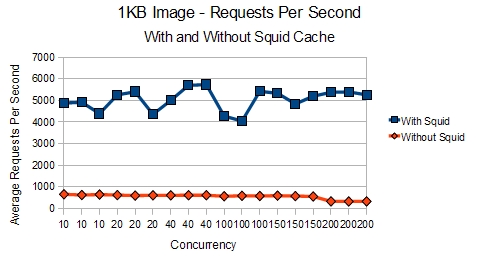
First off, let’s look at the results of a 1KB image with and without Squid Cache:
With this smaller file, the results show that Apache is clearly able to deliver roughly 700% more requests per second with Squid
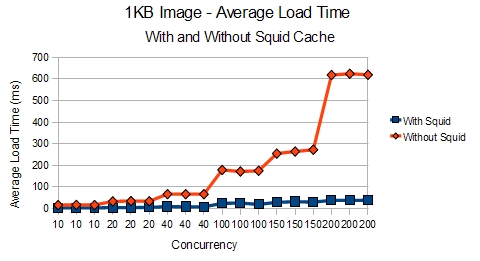
We can also see how Squid allows Apache to handle even 200 concurrent threads requesting the image without breaking a sweat.
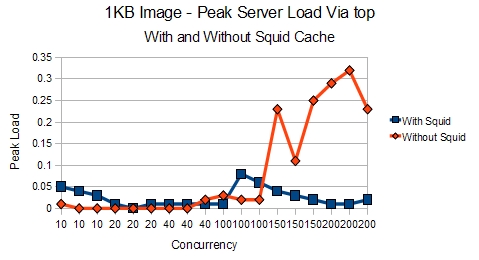
In addition, the server was relaxing, not having to create a bunch of Apache processes, when you look at the load compared to with and without Squid.
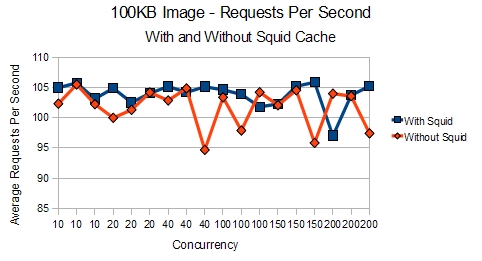
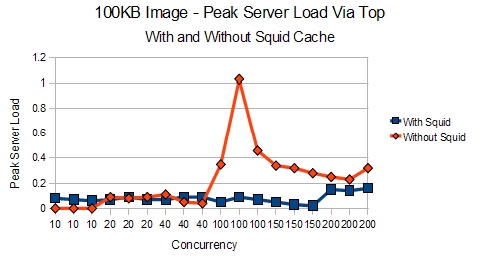
The same test was performed for an 100KB image to see if the results would be the same.
With the larger file, we can see that the differences are less apparent.
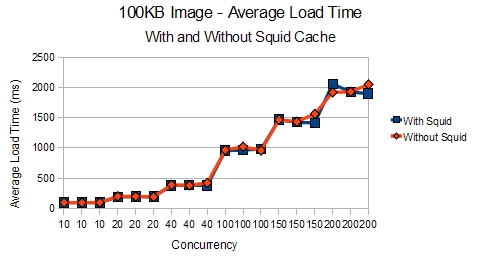
Even the load times look almost the same when you are using a 100KB image instead of a 1KB image.
However, the kicker is when you look at the load that the server is placed under. With Squid, the web server doesn’t have to work as hard since it doesn’t have to create all those Apache processes to answer for the image.
So, one can clearly see that for smaller objects and files, Squid can have a remarkable difference in what you can push out of your server. The results are much clearer when using a testing platform that allows for one to download embedded content. However, that would be suitable for a post some other time. For now, we’ll move on to the results of our other caching solution.
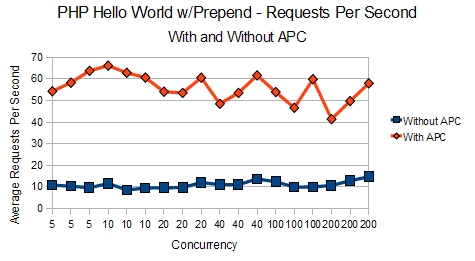
Seeing how Squid provided such excellent results, it was definitely time to look for a caching solution for PHP. APC was the natural choice considering it’s inclusion in the new version of PHP. After exploring it, we installed it and were astonished again by the results. Our server, which was keeling over under 10-20 requests per second was now able to deliver 50-60 requests per second, a 400% increase in performance! But don’t believe me, I’ll let the charts speak for themselves.
These test were performed on a simple Hello World PHP application:
<?php
    echo 'Hello World';
?> |
<?php
echo 'Hello World';
?>
Our prepend configuration means both memcached and PostgreSQL are invoked when our simple Hello World test was run. This was ideal so we had a baseline when more testing is performed on our actual application code. Here are the results of those tests:
It’s easy to see how APC allows for many more requests per second to be served.
The load times offer an even better look at how APC allows the server to remain calm even under high load. Obviously 15-20 second load times was not acceptable. However, APC allowed the load times to remain under 5 seconds even with 200 concurrent threads slamming on the server.
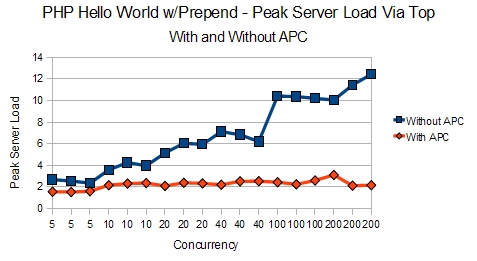
Again, some of the best information is seen in the peak loads. The server is, quite obviously, doing much less work thanks to APC. This is especially evident in the 100-200 concurrency levels when the server was showing loads of 10-12.
So, if you haven’t thought about installing Squid Cache or a PHP cache, like APC yet, hopefully these benchmarks will be enough to convince you of their merit. Considering the ease with which these two caches can be setup and installed, you’re doing yourself and your hardware a disservice without them.
Well, that wraps up this post. Stay tuned for my next post for hints on tuning Apache configuration settings, PostgreSQL settings, and the trials and tribulations of moving an application from a simple site to a completely automated SaaS.
If you liked this post, then please consider subscribing to my feed.