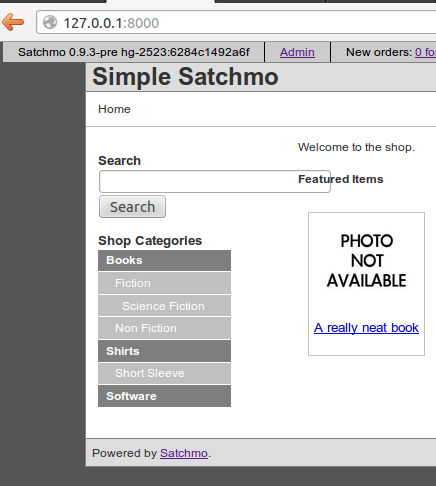
There are a few different options that are often mentioned regarding Django and eCommerce services. I could have rolled my own but I’m trying to get better about giving previously built and tested libraries more of a chance before doing so.
After some research, I decided to give Satchmo a try for a shopping cart front. While I did come across some newer projects like Satchless, I wanted to see what the most popular one was up to. Satchmo was the most talked about and came up the most in conversations so I decided to dive in. The Quick Start guide got me most of the way there but I did hit a couple of hiccups that I thought I’d share with everyone.
First off, make sure you run everything in sudo.
My first step I didn’t read that Mercurial had to be installed. So if you miss that and get something like:
randomdrake:~$ sudo pip install -e hg+http://bitbucket.org/chris1610/satchmo/#egg=satchmo
Obtaining satchmo from hg+http://bitbucket.org/chris1610/satchmo/#egg=satchmo
  Cloning hg http://bitbucket.org/chris1610/satchmo/ to ./src/satchmo
Cannot find command 'hg'
Storing complete log in /home/randomdrake/.pip/pip.log
Just run:
sudo apt-get install mercurial
Once I got things installed, I wanted to dive right in and start configuring things. With the project cloned, I fired up the server with a python manage.py runserver and hopped over to 127.0.0.1:8000. I was a bit disappointed to see that the text input box doesn’t properly fit on the default index page. Maybe that should be fixed somewhere?

But, no matter. I wasn’t after the design, I wanted the structure to build on top of. After clicking around for a bit, I thought it would be easy to find the template files and start to understand how the default page is done. Turns out I was a bit wrong. I started to browse through the source that gets installed by default for you. You can find it here:
/src/satchmo/
After digging around for a little while and doing some finds, I decided to ask the Googles and see what I could come up with. Fortunately I found a little note in the Wiki that explained where I could start looking with a bit more clarity. So, to get rolling I hopped in the base.html file that is located here:
/src/satchmo/satchmo/apps/satchmo_store/shop/templates/base.html
I simply copied this file into my local application’s /store/templates/shop/ directory and I was able to start hacking around on the layout.
Now that I had direct access to modifying the default template, I wanted to get it running in PostgreSQL. We can see, by default, it is setup to run in a SQLite database by looking in our /project/store/local_settings.py file:
DATABASES = { 'default': { # The last part of ENGINE is 'postgresql_psycopg2', 'mysql', 'sqlite3' or 'ado_mssql'. 'ENGINE': 'django.db.backends.sqlite3', 'NAME': os.path.join(DIRNAME, 'simple.db'), # Or path to database file if using sqlite3 #'USER': '', # Not used with sqlite3. #'PASSWORD': '', # Not used with sqlite3. 'HOST': '', # Set to empty string for localhost. Not used with sqlite3. 'PORT': '', # Set to empty string for default. Not used with sqlite3. } } |
After creating a new database and database user on my local machine, I simply filled the the values and ran the following:
python manage.py syncdb
A quick visit to my local host and I could see everything was working splendidly. I didn’t have any of the sample data to get in the way and I could simply start going through and creating my site completely from scratch. Just what I was looking for.
Hopefully you found this guide helpful to getting you up and running with Satchmo. If you liked this post, please follow me @randomdrake or consider following my feed.